container-playground
MPI + GPUs in Containerized Applications on AzHOP
The basic use-case is simple: we want to run a containerized application that uses MPI on a cluster setup using AzHOP. We want to ensure that the containerized application is able to use the correct interconnect available on the cluster. Secondly, we want to ensure that the containerized application is able to use the GPUs available on the cluster for rendering.
To make the use-case more concrete, let’s say we want to run containerized ParaView batch client on a cluster setup using AzHOP.
Building the container
This repository contains a script to build the container image. We build two separate sets of containers, with and without GPU-accelerated rendering.
To build the containers, run the following command:
# tag_suffix is optional and if provided, will be appended to the container tag
./build_container.sh <container_name> [tag_suffix]
To optionally push the containers to container registry such as Docker Hub or Azure Container Registry, run the following command:
# build and push container images
./build_container.sh --push <container_name> [tag_suffix]
The default registry is docker.io, to change it, fully qualify the container name
e.g. myacr.io/utkarshayachit/container-playground.
This creates four container images with the following tags:
<container_name>:<mpi-impl>[tag_suffix]<container_name>:<mpi-impl>-glvnd[tag_suffix]– needs GPUs on host<container_name>:pv-osmesa[tag_suffix]<container_name>:pv-egl[tag_suffix]– needs GPUs on host
Where:
container_nameandtag_suffixare the arguments passed to the scriptmpi-implis one ofmpich,hpcxormpich+hpcxwhich is based on which MPI implementation(s) is (are) enabled by passing optional arguments to the script.
Command line options to the build_container.sh script are:
> ./build_containers.sh --help

Usage: ./build_containers.sh [OPTIONS] <container_name> [tag_suffix]

Options:
  -h, --help      Show this help message and exit
  -p, --push      Push the container to the registry
  --hpcx          Build the container with HPC-X
  --no-hpcx       Do not build the container with HPC-X (default)
  --mpich         Build the container with MPICH (default)
  --no-mpich      Do not build the container with MPICH
  --paraview      Build the container with ParaView (requires --mpich) (default)
  --no-paraview   Do not build the container with ParaView
Running the container on AzHOP
The container images are meant to be run on a cluster setup using AzHOP with SLURM as the job scheduler. PBS is currently not supported. We use Pyxis / Enroot to run the container images in a SLURM job with MPI.
Following are examples of running the tests in various configurations. To submit the job, run the following commands must be run in the shell on Code Server, Linux Desktop, or Jupyter on the cluster. These cannot be run from the [Cluster Shell Access] available in the OnDemand portal.
Validating MPI setup
Let’s first run some basic benchmarks to ensure that the MPI setup is working correctly. The containers include OSU benchmarks
and Intel MPI Benchmarks. Both of these benchmarks are run using scripts under /opt/launchers in the container.
/opt/launchers/osu.sh can be used to execute an OSU benchmark, and /opt/launchers/imb.sh can be used to execute an IMB benchmark.
Both these scripts take the name of the benchmark as the first argument, and the arguments to the benchmark executable as
the rest of the arguments, if any. For example, to run the osu_bibw benchmark, we can run the following command:
# OSU benchmark: osu_bibw on single node
srun -N 1 -n 2 --mpi=pmix -p hbv3u18                      \
  --container-image=$container_name:$mpi_impl$tag_suffix  \
  /opt/launchers/osu.sh osu_bibw

# OSU benchmark: osu_bibw on 2 nodes
srun -N 2 -n 2 --mpi=pmix -p hbv3u18                      \
--container-image=$container_name:$mpi_impl$tag_suffix    \
/opt/launchers/osu.sh osu_bibw
For Intel MPI benchmarks, to run the ping-pong benchmark, we can run the following commands:
# IMB benchmark: pingpong on single node
srun -N 1 -n 2 --mpi=pmix -p hbv3u18                      \
  --container-image=$container_name:$mpi_impl$tag_suffix  \
  /opt/launchers/imb.sh IMB_MPI1 PingPong

# IMB benchmark: pingpong on 2 nodes
srun -N 2 -n 2 --mpi=pmix -p hbv3u18                      \
  --container-image=$container_name:$mpi_impl$tag_suffix  \
  /opt/launchers/imb.sh IMB_MPI1 PingPong
The scripts run the requested benchmark using each of the MPI implementations available in the container. For containers with
both MPICH and HPC-X, i.e. where the mpi_mpl is mpich+hpcx, you can pick one of the implementations by passing either --mpich
or --hpcx as the first argument to the script.
Here’s a sample output of the ping-pong benchmark running on 2 nodes:
> srun -N 2 -n 2 --mpi=pmix -p hbv3u18                          \
    --container-image=utkarshayachit/container_playground:mpich \
    /opt/launchers/imb.sh IMB_MPI1 PingPong

# <...snip...>

#---------------------------------------------------
# Benchmarking PingPong
# #processes = 2
#---------------------------------------------------
       #bytes #repetitions      t[usec]   Mbytes/sec
            0         1000         1.78         0.00
            1         1000         1.77         0.56
            2         1000         1.77         1.13
            4         1000         1.78         2.25
            8         1000         1.77         4.51
           16         1000         1.78         8.98
           32         1000         1.93        16.58
           64         1000         1.97        32.56
          128         1000         2.04        62.78
          256         1000         2.59        98.72
          512         1000         2.65       193.29
         1024         1000         2.75       371.73
         2048         1000         2.96       692.71
         4096         1000         3.67      1114.95
         8192         1000         4.08      2006.38
        16384         1000         5.37      3053.25
        32768         1000         9.43      3475.54
        65536          640        10.86      6035.49
       131072          320        13.61      9630.30
       262144          160        18.88     13885.77
       524288           80        29.74     17629.59
      1048576           40        51.03     20547.05
      2097152           20        93.52     22425.03
      4194304           10       178.50     23496.86


# All processes entering MPI_Finalize
Debugging notes:
-
Don’t forget to use
--mpi=pmixto enable MPI support using pmix. This is required to run MPI jobs for containerized applications. The MPI impementation inside the containers must also be built withpmixsupport. This is the reason by the container images are built with MPICH from source withpmixsupport enabled. -
The launch command for the executable does not need to do
mpirun. The executable will be launched on each rank and theMPI_Initcall will take care of the rest. -
Add
--export=ALL,UCX_LOG_LEVEL=info,UCX_PROTO_INFO=y,UCX_PROTO_ENABLE=yto thesruncommand to enable UCX logging. This is useful to debug UCX issues. Also helps determine if the correct interconnect is being used. -
If bandwidth numbers are low especially when running jobs across multiple nodes, ensure that SKU you’re running on RDMA-capable. You can check this by running
ibv_devinfoon the compute nodes. If the output shows no IB devices are found, then the SKU is not RDMA-capable.
Validating GPU setup
The easiest way to verify that the GPU setup is working correctly is to run nvidia-smi on the compute nodes from within
the container.
> srun -N 1 -n 1 --gpus=1 -p viz3d --container-image=$container_name:mpich-glvnd$tag_suffix nvidia-smi

# output
pyxis: importing docker image: utkarshayachit/container_playground:pv-egl
Mon Feb 27 19:23:14 2023
+-----------------------------------------------------------------------------+
| NVIDIA-SMI 470.82.01    Driver Version: 470.82.01    CUDA Version: N/A      |
|-------------------------------+----------------------+----------------------+
| GPU  Name        Persistence-M| Bus-Id        Disp.A | Volatile Uncorr. ECC |
| Fan  Temp  Perf  Pwr:Usage/Cap|         Memory-Usage | GPU-Util  Compute M. |
|                               |                      |               MIG M. |
|===============================+======================+======================|
|   0  Tesla M60           Off  | 00000001:00:00.0 Off |                  Off |
| N/A   31C    P8    15W / 150W |     47MiB /  8129MiB |      0%      Default |
|                               |                      |                  N/A |
+-------------------------------+----------------------+----------------------+

+-----------------------------------------------------------------------------+
| Processes:                                                                  |
|  GPU   GI   CI        PID   Type   Process name                  GPU Memory |
|        ID   ID                                                   Usage      |
|=============================================================================|
|    0   N/A  N/A     13267      G   /usr/bin/X                         36MiB |
|    0   N/A  N/A     13328      G   /usr/bin/gnome-shell                8MiB |
+-----------------------------------------------------------------------------+
By default, viz3d partition is setup to use Standard_NV12s_v3 SKUs. These SKUs have 1 GPUs each. The --gpus=1 option is required
to ensure that the GPU is allocated to the job.
Notes on the MPI Implementation
The MPI implementation used in the container is MPICH. The build_containers.sh script also supports building containers
with HPC-X by passing the --hpcx flag. This will ensure that the container images built have both MPICH and HPC-X installed.
You can disable MPICH by passing the --no-mpich flag. This is useful if you want to build a container with only HPC-X. However, note
ParaView requires MPICH. The prebuilt ParaView binaries rely on MPICH ABI compatibility to use platform MPI implementation. Since HPC-X
does not support MPICH ABI compatibility, the prebuilt ParaView binaries will not work with HPC-X. This is why the container images
are built with MPICH by default. If --no-mpich is passed, then --no-paraview must also be passed to ensure that ParaView containers
are skipped as well.
If your application requires a different MPI implementation, you can build your own container image with the MPI implementation. A couple of things to keep in mind:
- The MPI implementation must be built with pmix support. This is required to run MPI jobs for containerized applications.
- The MPI implementation must be built with UCX support. This is required to use Infiniband for MPI communication.
Putting it all together
Now that we have verified that the MPI and GPU setup is working correctly, we can run a ParaView batch job.
Let’s create simple Python visualization script:
# written for paraview version 5.11.0
# Save this script as $HOME/paraview_test.py
from paraview.simple import *
import os.path
import time
pm = servermanager.vtkProcessModule.GetProcessModule()
layout = CreateLayout(name='Layout #1')
v1 = CreateView('RenderView')
AssignViewToLayout(view=v1, layout=layout)
# add annotation
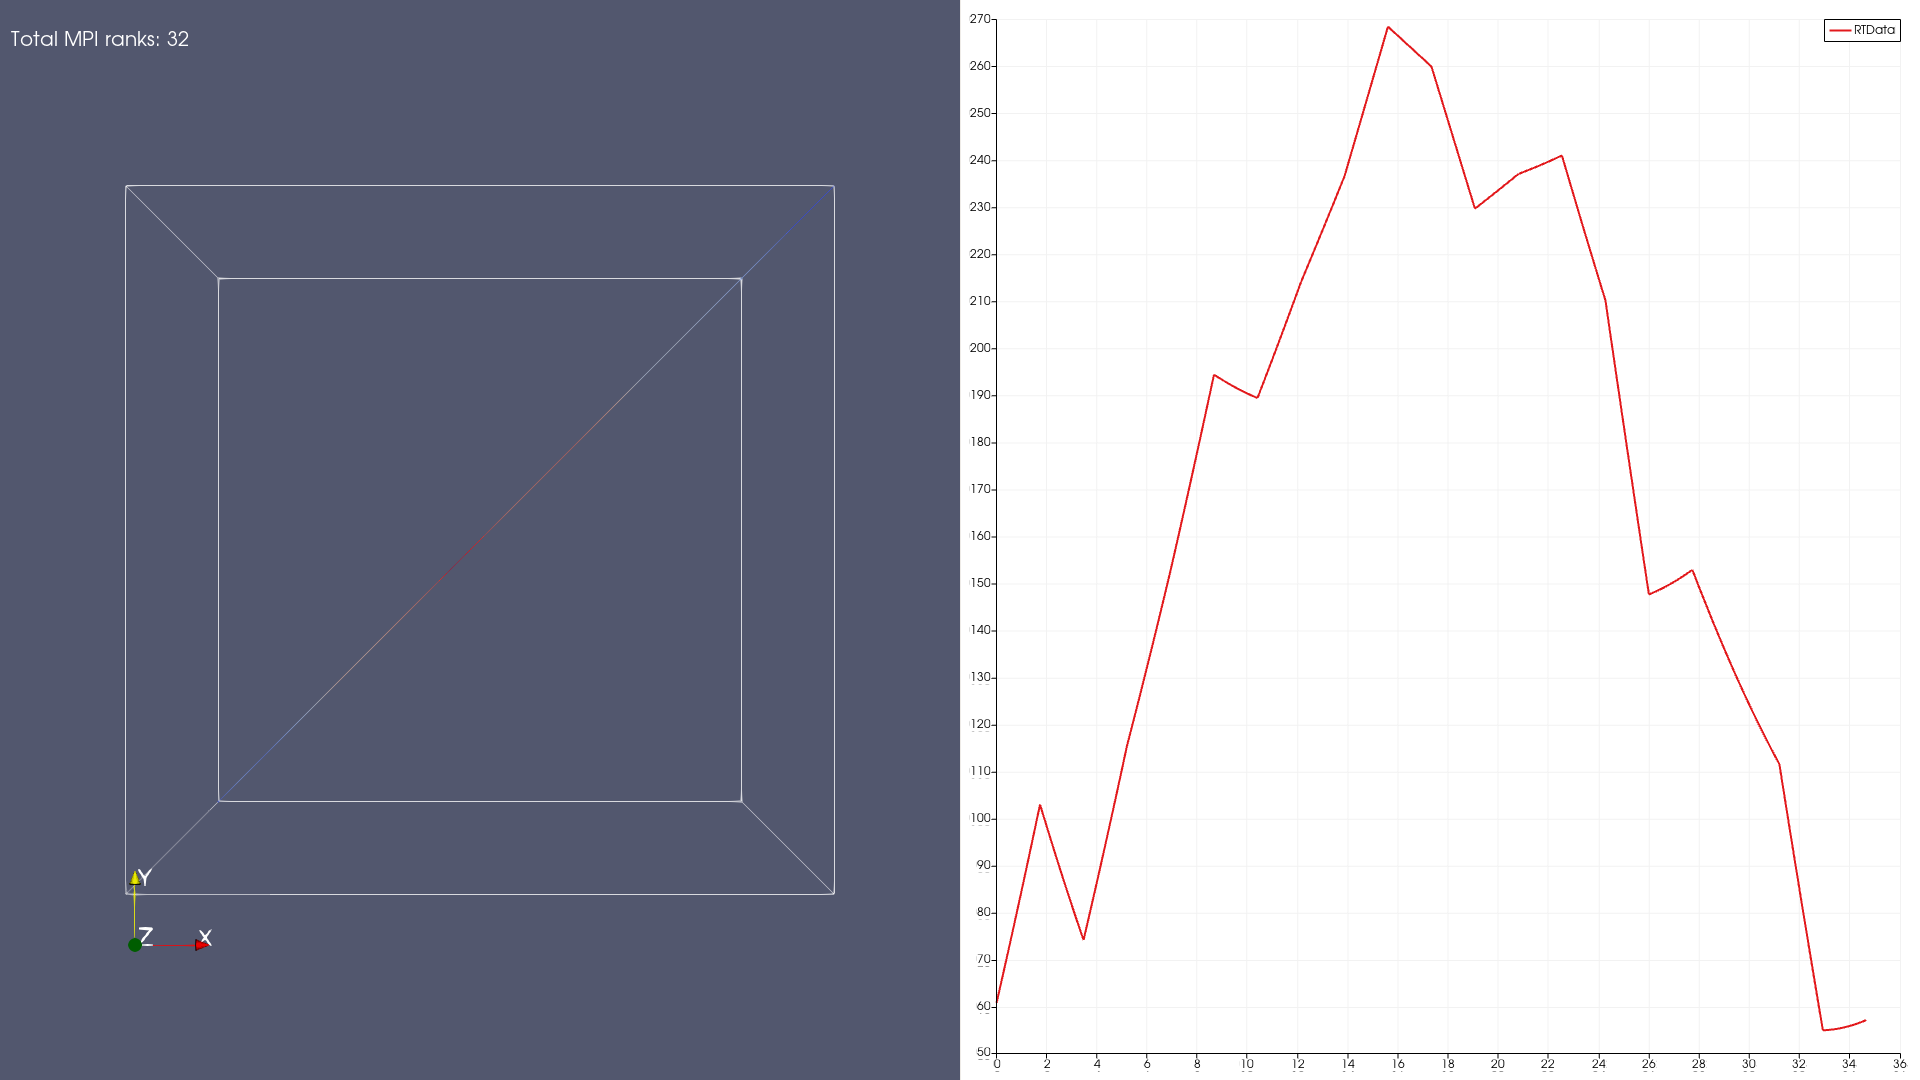
text = Text()
text.Text = f"""
Total MPI ranks: {pm.GetNumberOfLocalPartitions()}
"""
textDisplay = Show()
textDisplay.Justification = 'Left'
textDisplay.FontSize = 20
Wavelet()
Show()
Render()
# split view
layout.SplitHorizontal(0, 0.5)
# show a line plot
v2 = CreateView('XYChartView')
AssignViewToLayout(view=v2, layout=layout)
PlotOverLine()
Show()
# show line in render view as well
Show(view=v1)
# generate a screenshot.png in the home directory
layout.SetSize(1920, 1080)
SaveScreenshot(os.path.expandvars('$HOME/screenshot.png'), layout)
Since AzHOP mounts the home directory as a shared volume on all nodes, we will save this script in the home directory and also save the screenshot in the home directory so we can access it easily.
Now, let’s run the ParaView batch job:
# using non-GPU nodes
> srun -N 1 -n 2 -p hbv3u18                                         \
    --mpi=pmix                                                      \
    --container-image=utkarshayachit/container_playground:pv-osmesa \
    /opt/launchers/mpich.sh                                         \
    /opt/paraview/bin/pvbatch                                       \
    --system-mpi                                                    \
    $HOME/paraview_test.py

# using GPU nodes
> srun -N 1 -n 2 -p viz3d                                           \
    --mpi=pmix                                                      \
    --gpus=1                                                        \
    --container-image=utkarshayachit/container_playground:pv-egl    \
    /opt/launchers/mpich.sh                                         \
    /opt/paraview/bin/pvbatch                                       \
    --system-mpi                                                    \
    $HOME/paraview_test.py
On successful completion, you should see a screenshot.png in your home directory as shown below. This
image generated on a single hbv3u18 with 32 ranks (i.e. using srun -N 1 -n 32 -p hbv3u18 ...).
Debugging notes:
- The state purposefully adds
Total MPI ranksannotation to the view. If this does not match the number of MPI ranks in your job, then the setup is not working as expected. Make sure--mpi=pixis passed tosrun. Also, ensure--system-mpiis passed topvbatch. This ensures that ParaView will not override system-MPI with MPICH binaries bundled with the executable. Finally, use the/opt/launchers/mpich.shlauncher to launch thepvbatchexecutable. This ensures thatLD_LIBRARY_PATHis set up to load container-built MPICH implementation rather than the one packaged by ParaView. - To correctly use GPUs on the SKUs with GPUs, ensure you’re using the
pv-eglcontainer and not thepv-osmesacontainer. Also, ensure that--gpus=1is passed tosrunto ensure that the GPU is allocated to the job.
Wrapping up
While it can seem a little confusing at first, the setup for using MPI and GPUs in containerized applications is not too difficult. The key is to ensure that the containers are configured correctly. The scripts in this repository will help you get started with this setup. Next, we need to the runtime environment is setup properly. AzHOP makes our lives much easier there by ensuring the container runtimes are properly configured.
Acknowledgements
This work benefited from the containerization efforts here.